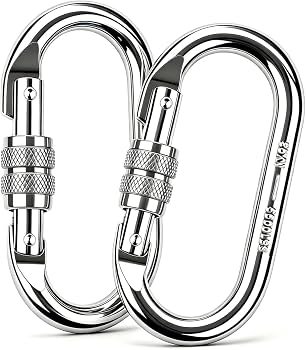
A pre-climb locking carabiner inspection means checking four things in roughly 30 seconds: frame integrity (cracks, deformation, and rope grooves exceeding 10% of the metal thickness), gate action (snap-back speed and alignment), locking mechanism (full engagement without grit or hesitation), and surface condition (corrosion or chemical exposure). If any one of them fails, the biner is done. Retire it on the spot.
The 30-Second Field Check
Muscle memory saves lives on the wall. A pre-climb inspection shouldn’t require a manual. It should be a sequenced physical routine you run at the base of the route, and you should be transitioning from looking at the hardware to actively palpating and testing its mechanics.
First, scan the frame for symmetry. Look at the spine, the basket, the nose. Any visible twist or deformation means the biner took a heavy cross-loaded fall, and it needs to come off your rack.
Second, run your thumbnail along the rope-bearing surface inside the basket. You’re feeling for sharp burrs or grooves. If your nail catches deeply, the wear limit may already be compromised.
Third, push the gate sideways against the rivet. Light lateral pressure. You’re checking for side-to-side play, and excessive wobble usually means a damaged hinge pin.
Fourth, open the gate fully and release it abruptly. It has to snap back against the nose instantly under its own spring tension. A gate that lags for even half a second is an immediate failure. This is the single most useful test in the whole routine, and it takes about a second.
Fifth, engage the locking collar. Spin the screw-gate all the way closed, or let the auto-lock twist shut on its own. The mechanism must seat completely against the nose without forced pressure.
Finally, check the hinge and pins for white powdery buildup, which is aluminum oxidation. Light surface oxidation wipes off with a rag. Deep pitting around the rivet is a different story and compromises the gate’s structural hold.
Reading the Frame — What Cracks, Grooves, and Dents Actually Mean
The frame — spine, basket, crotch — carries the entire load during a fall. Being able to tell cosmetic wear from structural damage is the whole game here. Drop a carabiner on a rock and you’ll get scuffing. Missing anodized color is harmless and expected after a single weekend of climbing, and honestly, if your rack still looks factory-new after a season, you probably aren’t climbing much.
Structural damage looks different. The most common failure point is the rope groove. A rope pulling through the basket under tension acts like a slow saw, and it takes aluminum with it over time. When that groove hits 1 millimeter in depth, or 10% of the original metal thickness, the unit’s done. Push past that threshold and you’re creating sharp edges on the sides of the groove that can slice a loaded 9.8mm rope during a lead fall.
Hairline cracks: zero tolerance. Cracks tend to propagate near drilled holes — the rivet pin hole at the hinge, or the keeper cord hole on the nose. Any linear fissure in the aluminum, the unit is dead.
Dents mean blunt-force trauma. A 2mm deep dent on the spine tells you the biner was smashed against the rock face during a fall, and that alters the internal grain structure of the alloy. It creates a stress riser. Any frame with visible inward dents or bending, retire it.
Gate Mechanics — The Test Most Climbers Skip
A gate that physically closes isn’t the same as a gate that closes correctly. When a carabiner gate is fully closed, the unit typically holds 24 kN along its major axis. Open that gate even slightly and overall strength drops to roughly 7 to 9 kN. About a third of closed strength. That’s the difference between catching a whipper and not.
Test the snap-back speed. Hold the carabiner horizontally, open the gate to its maximum travel, let go. Return action should be immediate and aggressive. If the gate hesitates, hangs up, or needs a manual push to seat against the nose, the internal spring is degraded or fouled with grit.
Check the alignment. On keylock designs, the gate must slot cleanly into the nose recess. If it strikes the side of the nose before sliding into place, the frame is bent. For traditional wire-gate or hooked solid-gate designs, inspect the hook itself, because hooks are prone to burring, and a sharp burr on a nose hook will snag the sheath of your rope or your PAS.
Gate flutter is the one people forget. It’s when the gate vibrates open for a fraction of a second during a hard impact against the rock. Weak gate springs make flutter worse, and if your inspection reveals a soft, easily depressed gate spring, the risk of flutter goes up sharply.
Screw-Gate vs. Auto-Lock vs. Triple-Action — Each Fails Differently
Treating all locking carabiners as identical hardware is how you miss things. Different locking mechanisms have different moving parts and each one suffers from its own specific vulnerabilities.
Screw-gates have a threaded collar. They fail through cross-threading, overtightening, or vibration backing off. A screw-gate that gets weighted while the collar is resting against a rock can seize tight enough to need pliers. On the other end, rope drag can spin a loose collar open on you.
Auto-locking mechanisms use an internal torsion spring to twist the collar shut automatically. They fail when the spring loses tension after thousands of cycles, or when salt buildup creates friction inside the sleeve.
Triple-action carabiners require three distinct motions: slide, twist, open. Highest security against accidental opening, most susceptible to environmental fouling. Fine sand bypasses the initial slide mechanism and packs into the secondary twist track, and the whole thing jams.
| Mechanism | How it Fails | What to Test | Common Causes |
|---|---|---|---|
| Screw-Gate | Backs off under vibration or seizes tight. | Spin the collar its full length. Check for gritty resistance. | Grit in the threads; overtightening under body weight. |
| Auto-Lock | Fails to snap completely shut. | Pull the gate open halfway and release. Ensure it locks fully. | Spring fatigue; dried liquids; salt spray buildup. |
| Triple-Action | Jams in the secondary twist stage. | Operate rapidly with one hand. Check for hesitation. | Fine sand or mud packed inside the twist barrel. |
Anyway, my personal bias here: I still spec screw-gates for most anchor work even though the auto-locks are objectively more foolproof. Old habit. Not really defensible.
Invisible Damage — Chemical, Thermal, and Fall History
The most dangerous threats to climbing hardware leave no visible marks. Chemical exposure destroys aluminum from the inside out. Battery acid — the kind of thing gear picks up when it sits on the floor of a car trunk — causes intergranular corrosion, and even brief contact wrecks the structural integrity of the metal. Aggressive solvents, chlorine bleach, and prolonged exposure to high-concentration DEET also mean immediate retirement. Yes, DEET. This surprises people every time.
Thermal damage alters the temper of the alloy. A carabiner left on a dashboard in the sun is fine. Hardware exposed to a direct flame or a campfire has to be destroyed. High-speed rope friction can sometimes generate enough heat to glaze the metal, but structural thermal degradation requires temperatures above 130°C (266°F).
The drop test myth drives more unnecessary retirements than anything else. A lot of climbers believe a carabiner dropped from 50 feet develops invisible microfractures and needs to come off the rack. Break testing shows this isn’t true. Aluminum doesn’t form microfractures from blunt impact. If a dropped carabiner shows no deformation, no deep gouges, and the gate still works right, it hasn’t lost its structural strength.
The Log Book Question — Tracking a Carabiner’s Life
Professional rope access techs work under strict logging protocols. IRATA and SPRAT require absolute traceability for all life-safety equipment — Make, Model, Serial Number, Date of Manufacture, Date of First Use, all of it, for every single carabiner. Those standards mandate a formal documented review by a competent person every six months.
Recreational climbers rarely keep logbooks, which is where the lifespan confusion starts. The European standard EN 365 recommends a 12-month inspection interval but doesn’t specify a maximum lifespan for metal hardware.
The aluminum fatigue debate produces a lot of unnecessary retirements too. Metallurgically, aluminum doesn’t have a fatigue limit — it will eventually fail under repeated stress. Fine. But test data indicates a climbing carabiner needs to see over 10,000 cyclic loads near its yield strength before it fails from fatigue, and in the real world, a biner will wear out from rope friction or gate spring failure decades before aluminum fatigue becomes a mathematical concern. You’re not going to fatigue-fail a locker. You’re going to groove-fail it or spring-fail it.
When to Retire — The No-Compromise Criteria
Your inspection is a binary. If a locking carabiner shows any of the following, it comes off the rack permanently. No exceptions.
- The rope groove exceeds 1mm in depth or 10% of the original metal thickness.
- The gate hesitates or fails to snap shut instantly on its own.
- The locking collar can’t complete its full travel because of damaged threads or a jammed spring.
- The frame, nose hook, or rivet area shows a hairline crack.
- Anywhere near battery acid, bleach, or corrosive solvents.
- Spine or basket visibly bent or deformed.
- The hinge pin has lateral play or severe white oxidation pitting.
- The unit was exposed to direct fire or extreme thermal heat.
Retiring a carabiner means making sure it never re-enters the climbing system. This part matters. Repurposing a retired locker for keys or a dog leash creates the real risk of it mixing back into your rack, which happens more than you’d think, especially in a shared house. Cut through the spine with a hacksaw, or smash the gate hinge flat with a hammer. Make it obviously unusable.
Cleaning and Maintenance That Extends Carabiner Life
Routine maintenance prevents premature retirement. Dirt, chalk, and salt spray accelerate the wear on moving parts and grind away the anodizing on the frame over time. Cleaning has a protocol, though, and you can absolutely make things worse if you improvise.
| Do This | Do NOT Do This |
|---|---|
| Wash in hot water. Submerge the carabiner and operate the gate rapidly to flush out sand. | Use WD-40. It’s a solvent that strips factory lubrication and leaves a wet residue that attracts more dirt. |
| Use a mild soap. A drop of non-detergent dish soap breaks down sticky residue from tree sap or spilled drinks. | Soak in aggressive solvents. Turpentine, brake cleaner, or bleach will destroy the aluminum finish and internal nylon washers. |
| Apply a dry lubricant. PTFE spray, graphite powder, or a wax-based ceramic lube on the hinge pin. | Use heavy wet oils. Motor oil and household 3-in-One trap grit inside the locking mechanism. |
| Air dry completely. Leave the hardware in a well-ventilated area until all moisture is gone from the barrel. | Store wet. Tossing damp hardware into a sealed nylon gear bag breeds corrosion. |
FAQ
How often should I replace a locking carabiner?
Retire based on condition, not age. Typically that means when the rope groove exceeds 1mm or the gate mechanism fails. Metal climbing hardware doesn’t have a set expiration date. Heavily used gym lockers might wear out in three years, weekend-use gear can last a decade or more.
Is it safe to use a carabiner that’s been dropped from height?
Yes, provided it passes a strict visual and functional inspection. Extensive break testing has demonstrated that blunt impacts from something like a 50-foot drop do not cause invisible microfractures in aluminum. What the impact can do is visibly bend the frame or damage the gate hinge, and both of those are things you’ll see during your normal check. So drop the biner, run the 30-second inspection, and if it passes, it passes. The panic-retire-anything-that-hits-the-ground crowd is throwing away perfectly good hardware.
What does a carabiner sound like when it’s failing?
A failing locking mechanism makes an audible gritty, grinding noise when you twist the barrel — sand packed in the threads. A failing gate spring loses its sharp metallic snap and sounds dull.
Can I use household oil to lubricate a sticky screw gate?
No. Wet household oils and degreasers like WD-40 attract dirt, sand, and chalk, turning your lock into a grinding paste. Use a dry PTFE spray, graphite powder, or a wax-based ceramic lube designed for moving metal parts.